You’re building your first Make.com automation. You add an OpenAI module and it asks for an “API key.” You add a Google Sheets module and it wants you to “create a connection” with something called OAuth. You try to convert HTML to PDF and the service needs a “secret key” with “Basic Auth.”
Suddenly you’re not building automations anymore. You’re managing passwords for robots.
API keys are the part of automation that nobody finds exciting – but everything breaks without them. This guide explains what they are, where to find them for the most common services, and how to avoid the mistakes that lock you out of your own workflows (or worse, let someone else in).
What is an API key?
An API key is a password that lets one application talk to another.
When you connect Make.com to OpenAI, Make.com needs to prove it has permission to use your OpenAI account. It does this by including your API key with every request. OpenAI sees the key, checks that it’s valid, and processes the request.
Without the key, OpenAI would reject the request. With someone else’s key, the charges would go to their account. That’s why keeping your keys safe matters – they’re not just technical configuration. They’re access credentials tied to your billing.
The word “API” stands for Application Programming Interface – basically a set of rules for how two applications communicate. The “key” is your proof of identity within that system.
API keys vs. OAuth – what’s the difference?
In Make.com, you’ll encounter two main ways to connect services:
API keys are simple. You copy a string of characters from one service and paste it into Make.com. Done. Services like OpenAI, PDFShift, and MailerLite use this approach.
OAuth is more involved. Instead of copying a key, you click a button that opens the service’s login page, you sign in, grant permissions, and Make.com receives a token automatically. Google services (Sheets, Drive, Gmail, Calendar) use OAuth.
The practical difference for you:
- API key setup: find the key, copy it, paste it. Takes 2 minutes.
- OAuth setup: create credentials in a developer console, configure permissions, authorize the connection. Takes 10-20 minutes the first time.
Both achieve the same goal – giving Make.com permission to act on your behalf. OAuth is more secure (the actual credentials never leave Google’s servers), but it’s also more complex to set up initially.
In the course, Workflow 1 introduces API keys (OpenAI), and Workflow 2 walks through the full Google OAuth setup that you’ll reuse in every Google-connected workflow after that.
Where to get API keys for common services
Here’s a quick reference for the services used most often in Make.com automations.
OpenAI (ChatGPT, GPT-4)
OpenAI’s API key lets Make.com send prompts and receive AI-generated text – the backbone of any AI-powered automation.
- Go to platform.openai.com
- Sign in (or create an account)
- Click your profile icon in the top right, then “API keys” (or go to the API keys section in the dashboard)
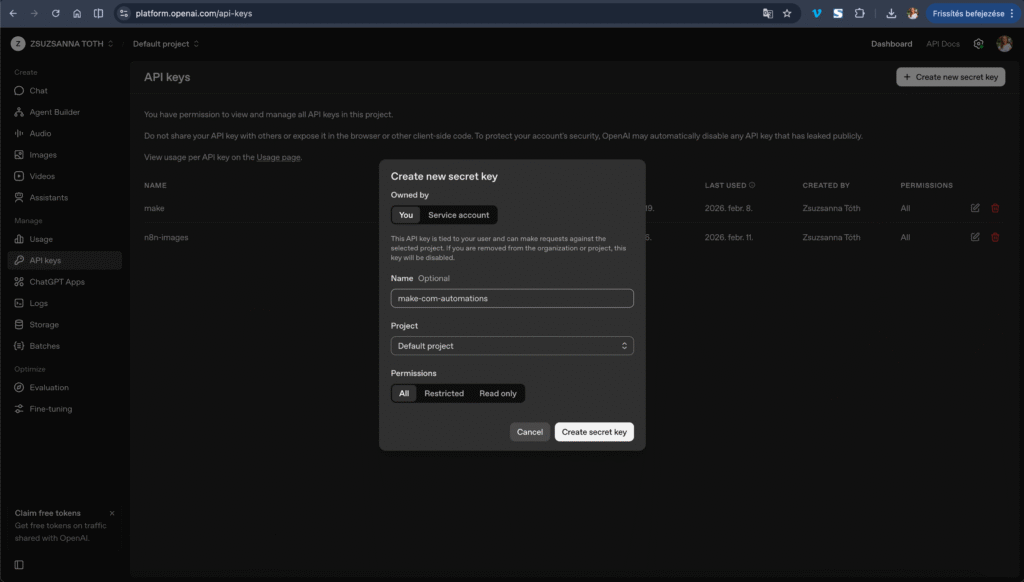
- Click “Create new secret key”
- Give it a name like “make-com-automations”
- Copy the key immediately – OpenAI only shows it once
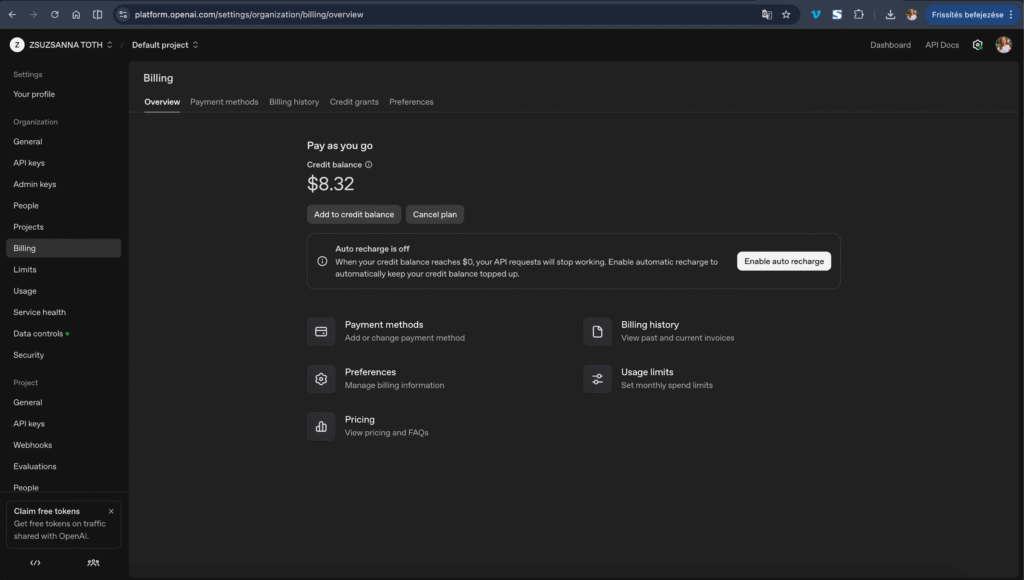
Important: OpenAI’s API is pay-as-you-go. You’ll need to add a payment method and set a spending limit. For typical small business automations, expect $5-20/month depending on usage. The model you choose matters – gpt-4o-mini is significantly cheaper than gpt-4o and works great for most automation tasks.
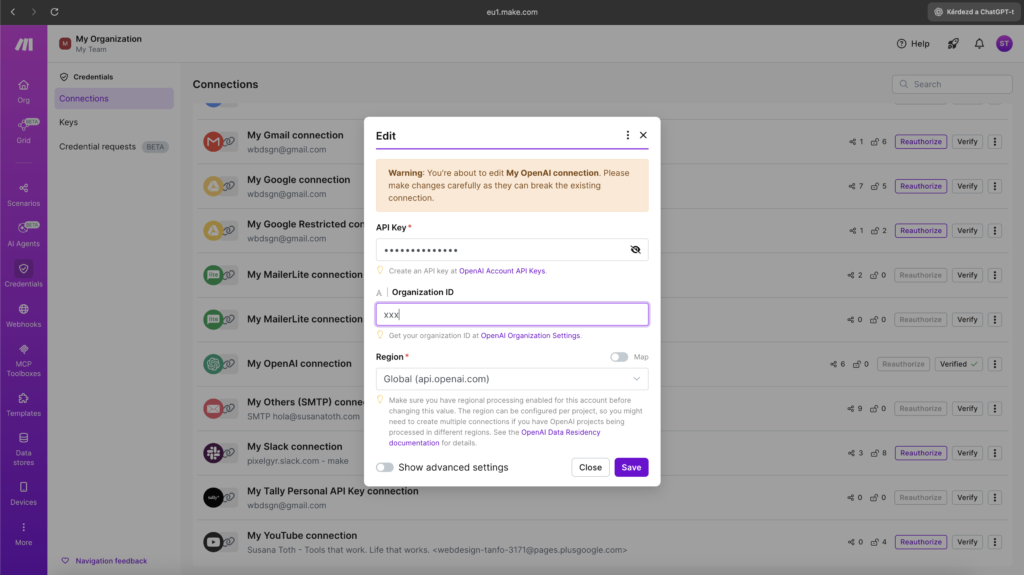
In Make.com: When you add an OpenAI module, click “Add” next to the Connection dropdown. Select “OpenAI” as the connection type, paste your API key, and save. Every OpenAI module in your account can reuse this same connection.
Google (Sheets, Drive, Gmail, Calendar)
Google uses OAuth instead of a simple API key. The setup is more involved but you only do it once – the same connection works across all Google services in Make.com.
The short version:
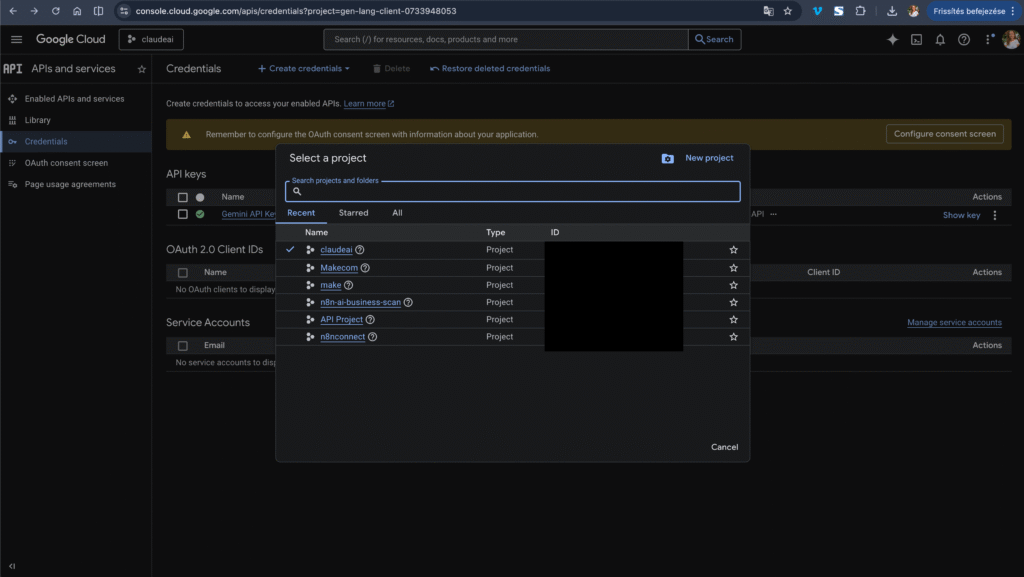
- Go to console.cloud.google.com
- Create a new project
- Enable the APIs you need (Google Sheets API, Google Drive API, Gmail API, etc.)
- Go to “Credentials” and create an OAuth 2.0 Client ID
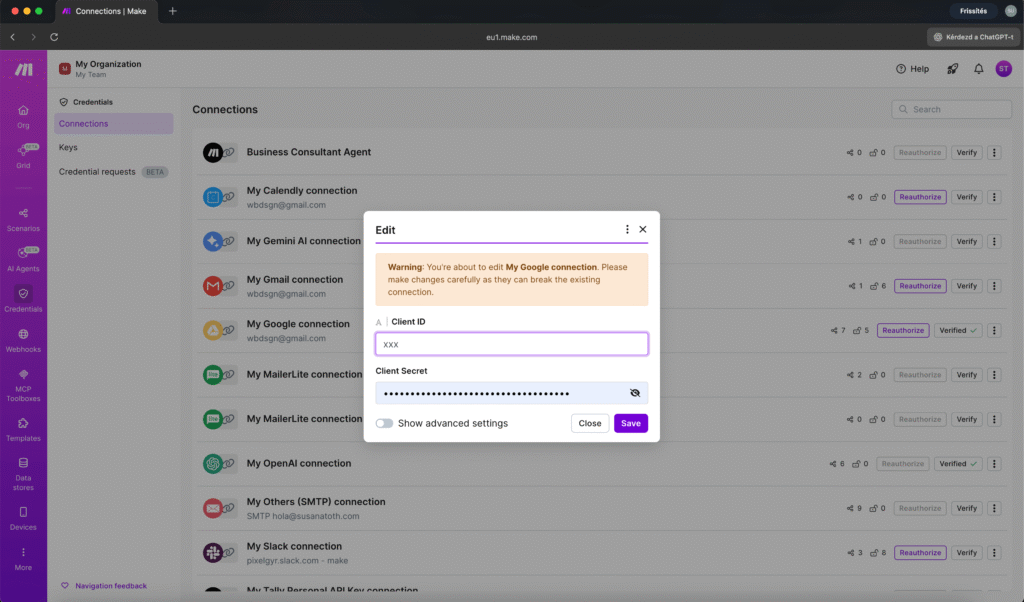
- Add your Client ID and Client Secret to Make.com’s Google connection
- Authorize by signing into your Google account when prompted
In Make.com: When you add any Google module, click “Add” next to Connection. Choose the Google service, paste your Client ID and Client Secret, then click “Sign in with Google” to authorize.
This is the single most common setup question in Make.com communities. If you get stuck, the course has a detailed walkthrough in Workflow 2 (Gmail + Google Drive) that covers every screen and every possible error.
PDFShift (HTML to PDF conversion)
PDFShift converts HTML into PDF files – used in the AI Quote Generator workflow to turn AI-written proposals into professional documents.
- Go to pdfshift.io and create an account
- Your API key is on the dashboard after login
- Copy it
The catch with PDFShift: It uses Basic Authentication, which means you can’t just paste the API key directly. You need to format it as api:YOUR_KEY_HERE and then Base64-encode the whole thing.
For example, if your key is sk_abc123, you’d encode api:sk_abc123 into Base64, giving you something like YXBpOnNrX2FiYzEyMw==. That encoded string goes into the Authorization header as Basic YXBpOnNrX2FiYzEyMw==.
You can use any online Base64 encoder (like base64encode.org) to do this conversion.
In Make.com: PDFShift doesn’t have a dedicated module, so you use the HTTP module (Make a Request). The API key goes into the Headers section as an Authorization header.
This sounds complicated, but in practice it’s a one-time, 5-minute setup. Workflow 6 in the course walks through every step.
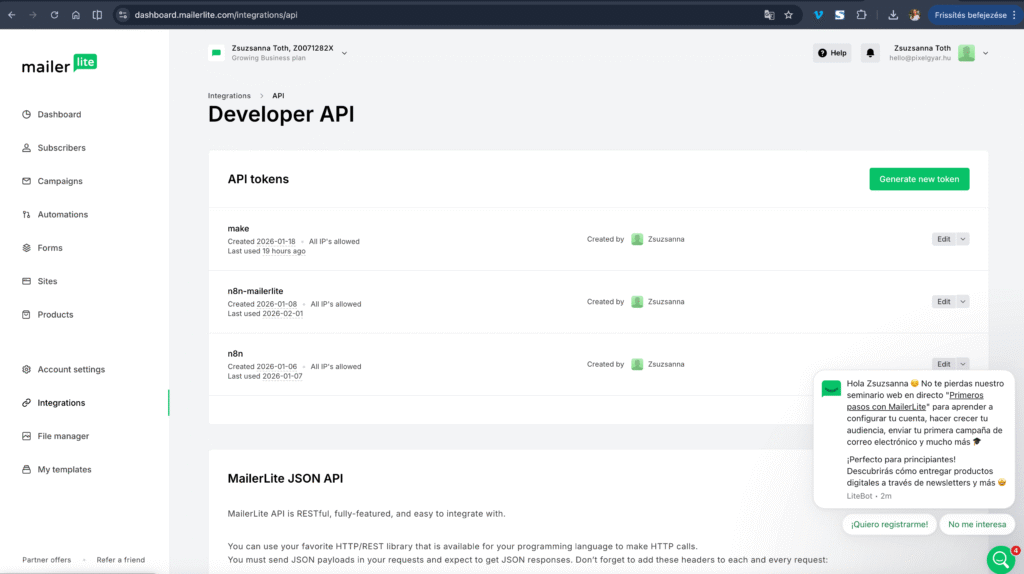
MailerLite (email marketing)
- Log in to MailerLite
- Go to Integrations (or Developer API)
- Click “Generate new token” or copy the existing one
- Paste it into Make.com’s MailerLite connection
In Make.com: Add a MailerLite module, click “Add” next to Connection, paste your API token. Straightforward.
Slack (notifications)
Slack can be connected through Make.com’s built-in module, which uses OAuth (similar to Google – click authorize, sign in, grant permissions). No manual API key needed.
For simple webhook-based notifications (one-way messages to a channel), you can also use Slack’s Incoming Webhooks – which gives you a URL you paste into Make.com’s HTTP module. This is simpler if all you need is to send alerts.
How Make.com stores your credentials
When you create a “Connection” in Make.com, your API keys and OAuth tokens are stored encrypted on Make.com’s servers. You only enter them once, and then any module in your account can use that connection.
This means:
- You don’t paste the API key into every module. You set up the connection once, and select it from a dropdown in each module.
- If a key changes (or expires), you update it in one place – the Connection settings – and all modules using that connection pick up the new key automatically.
- Other people cannot see your keys through Make.com’s interface. If you share a scenario blueprint with someone, the connections are not included. They’ll need to set up their own.
To manage your connections: click “Connections” in the left sidebar of Make.com. You’ll see every connection you’ve created, with options to rename, verify, or delete them.
How not to leak your API keys
API keys are essentially passwords. If someone gets your OpenAI key, they can run up charges on your account. If they get your Google OAuth credentials, they could access your Drive files or email. Here are the mistakes to avoid.
Never put API keys in public places
This sounds obvious, but it happens constantly. Common leaks:
- Sharing a screenshot of your Make.com scenario with the connection details visible
- Posting your API key in a community forum when asking for help
- Committing credentials to a public GitHub repository
- Putting API keys directly in webhook URLs that are visible in browser history
The rule: If anyone other than you can see it, your API key shouldn’t be there.
Set spending limits
Most API services let you set a maximum monthly spend. Do this immediately after creating your key.
For OpenAI: Go to Settings, then Billing, then “Usage limits.” Set a hard limit you’re comfortable with. If your automations are running correctly, you’ll rarely hit it. But if something goes wrong (like an infinite loop), the spending limit prevents a surprise bill.
Use separate keys for separate purposes
If you use OpenAI for both your Make.com automations and a separate project, create two different API keys. Name them clearly (“make-com-automations” and “website-chatbot,” for example).
Why? If one gets compromised, you can revoke it without breaking everything else. And if you need to track usage or costs, separate keys make it easy to see where the charges are coming from.
Rotate keys periodically
Every few months, create a new API key, update your Make.com connection, verify everything still works, then delete the old key. This limits the damage if a key was leaked without you knowing.
Be careful with blueprints
Make.com blueprints (the JSON files you can export and import) do not include your actual API keys or connection details. This is by design – it’s safe to share blueprints. But double-check before sharing any other configuration exports from other tools.
Watch your email
If an API provider sends you a “new sign-in” or “unusual activity” notification, take it seriously. It could mean someone is using your credentials.
What to do if you leak a key
It happens. Here’s the recovery process:
- Revoke the compromised key immediately. Go to the service’s dashboard (OpenAI, Google Cloud Console, etc.) and delete or deactivate the old key.
- Create a new key. Generate a replacement.
- Update Make.com. Go to Connections, find the affected connection, and update it with the new key.
- Check for unauthorized usage. Review the service’s usage logs and billing for anything unexpected.
- Test your scenarios. Run each affected workflow once to make sure the new key works.
The whole process takes 5-10 minutes. The important thing is speed – revoke first, then set up the replacement.
The credentials you’ll need for the course
If you’re planning to work through the Make.com Automation Course, here’s every credential you’ll need, organized by when you’ll first use it:
Workflow 1 (Contact Form + AI Response):
- OpenAI API key
- SMTP email credentials (your email provider’s settings)
Workflow 2 (Gmail + Google Drive):
- Google OAuth setup (Client ID + Client Secret from Google Cloud Console)
Workflow 3 (Calendly Automation):
- Calendly account (uses Make.com’s built-in connection)
- MailerLite API token
Workflow 5 (Review Response Bot):
- Slack workspace (OAuth via Make.com)
Workflow 6 (AI Quote Generator):
- PDFShift API key (with Base64 encoding)
Workflow 7 (SEO Article Writer):
- WordPress credentials (application password or REST API authentication)
Most of these have free tiers. The only pay-as-you-go cost is OpenAI, which typically runs $5-20/month for small business use.
The course walks through each credential setup in the workflow where it’s first needed. After that, you reuse the same connections in later workflows without repeating the setup.
Key takeaways
API keys are passwords that let Make.com talk to other services on your behalf. Some services use simple copy-paste keys (OpenAI, PDFShift, MailerLite), while others use OAuth (Google, Slack) which involves a more involved authorization flow.
Set them up once, store them in Make.com’s Connections, and protect them like any other password. Set spending limits, use separate keys for separate projects, and never share them publicly.
The hardest setup is Google OAuth – everything else is copy and paste. Once your credentials are in place, you can focus on building automations instead of managing access.
If you want the full walkthrough for every credential you’ll need – including the Google OAuth setup that trips up most beginners – the Make.com Automation Course covers each one step by step, in the workflow where you first need it.

Susana Toth
Make.com Certified Expert & Founder, La Maquina Studio
Susana Toth is a Make.com Certified Expert and the founder of La Maquina Studio, where she helps small businesses and consultants eliminate repetitive work through smart automation. With 20+ years of experience in web design, business consulting, and digital strategy, she builds practical AI-powered workflows that save hours every week — without writing a single line of code. She writes about Make.com automation, AI integration, and building systems that work while you don’t.
Learn more about me →